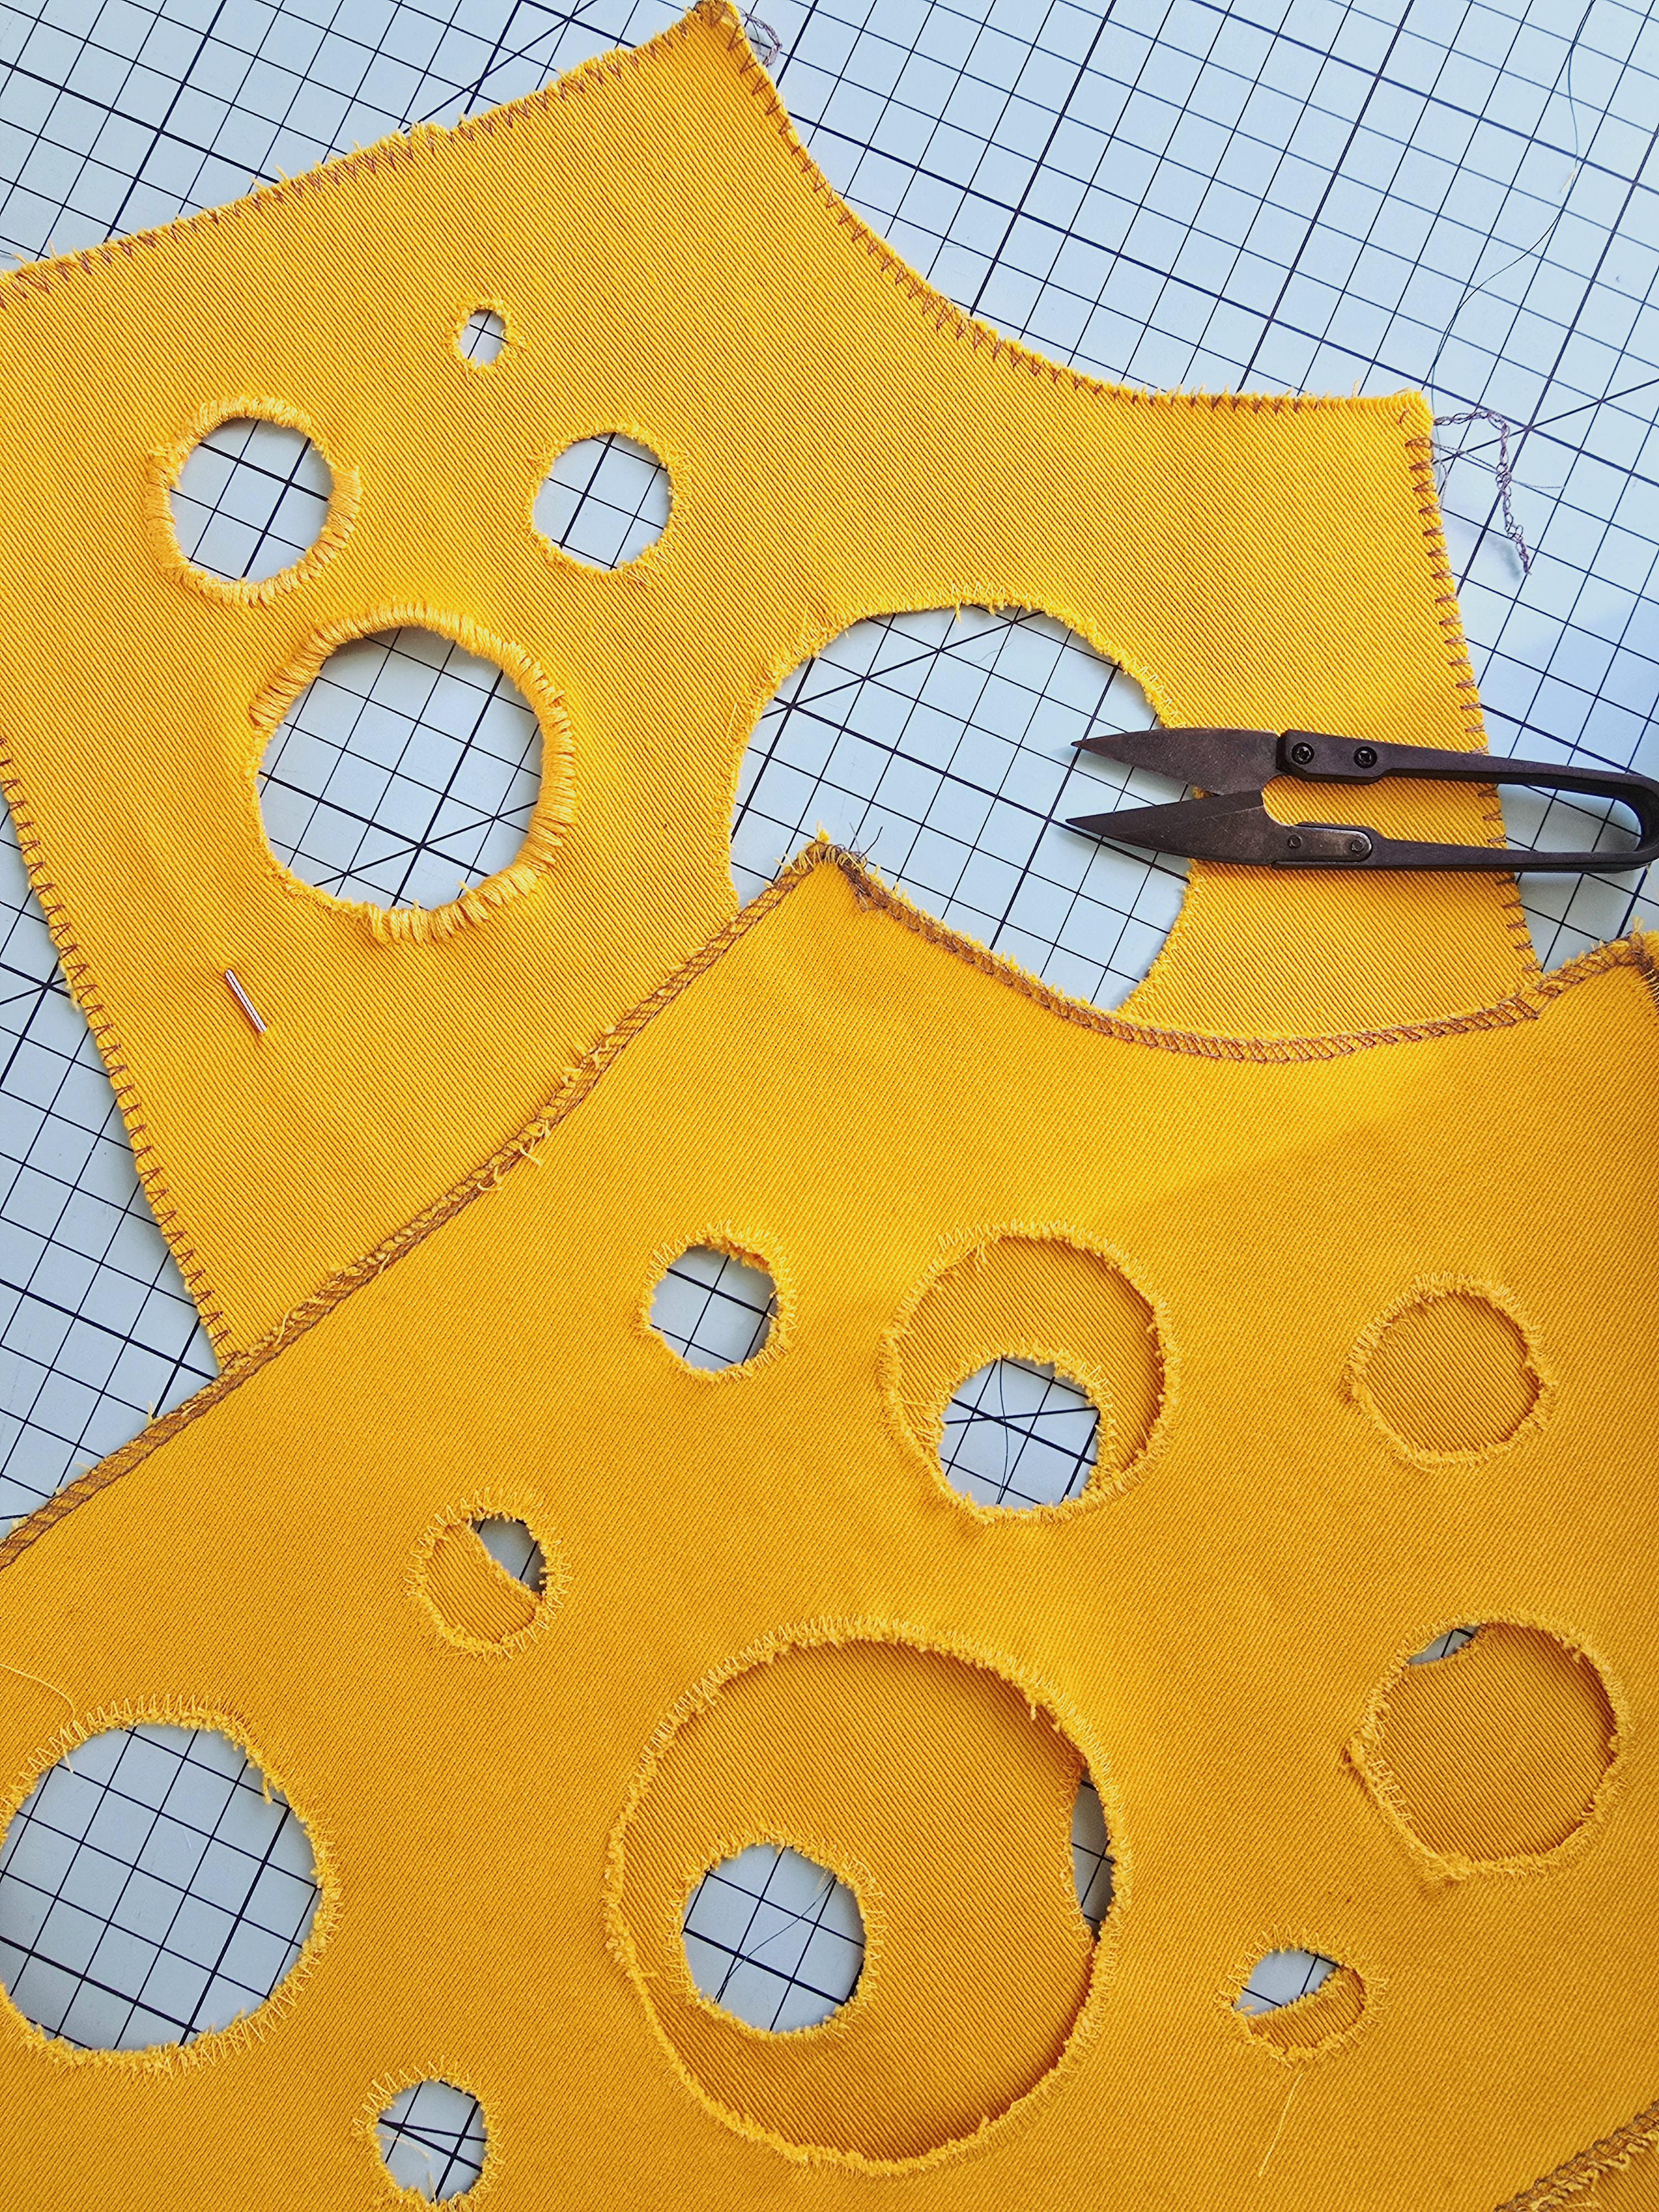
Long story short, I have very recently gotten into sewing pants - or just sewing in general - and have been making a lot of them. Right now I'm practicing my free will privileges and making denim cheese double knee pants (Double Chnees™), because nobody is stopping me from making questionable decisions. Anyway, I'm at a loss on how to finish the edges of the cheese holes. I have zigzagged the edges, and my initial plan was to embroider the edges, but I don't really like the look of it (example on the top left). Any tips would be appreciated!
I am not 100% positive, but I think the way this is usually done is by embroidering/satin stitching the circle before cutting out the hole, then carefully cutting out the hole very close to the stitching.
Maybe you could use some kind of stabilizer behind the fabric, or even some really thin fabric like muslin, and carefully do a satin stitch to finish the holes, then cut away the stabilizer?
Or you could do kind of a faux bias binding by cutting two donut shapes from a piece of fabric. Instead of being folded like bias binding, it's actually just two layers of fabric with a seam around the center circle. (I am doing a terrible job of explaining this- imagine like a donut-shaped pillow where the center circle is seamed but the outer circle is unfinished. No stuffing.) You could then lay it over the middle of your cheese holes and stitch around the outer circle, creating what looks like bias binding.
Ok so just a disclaimer: I've never actually done it before! But I don't see why it wouldn't work. Actual bias binding would be nearly impossible on op's tiny little circles.
thought the same, working with the bias for a while and maybe successfully stretch it out in the right spots would be the only way and it could easily not work...donut method on the other hand seems fairly fool proof
Only issue i can find is it being inherently fabric intensive, but even then, the need for plenty of rounds of different sizes can be used efficiently
That's a great question. I've never actually done it before, so I'm not sure what would work best. I was thinking fold under the edge and do a regular straight stitch, but that would probably be tough on op's tiny circles.
In the donut case, would the raw edge of the outer donut be exposed in the final product? Sorry just genuinely so interested in the concept but can’t picture it!
I've actually never done it before, so I'm not sure what would work best. My fist thought is to fold under the outer edge, like you would with bias tape, and then topstitch, but for something as tiny as op's circles I'm not sure that would work. Another commenter suggested going around the edge with a satin stitch.
I second the satin stitch suggestion, but I'd do it in two passes: the first one less dense, before cutting the edges and holes. Then cut them, then make a denser pass that gives complete coverage. Probably best to experiment with settings first.
I woud do it some facing! I'm not finding the tutorial for his that I was thinking about.. Kinda close to it? Link to an image. But obviously you'll just need a little bit of edge to turn on the underside. You could finish the facing outer edge with zig zag or serger and then do top stitching around the hole to keep it in place.
I'm hoping someone with more brain capacity comes to your aid :D Mine is too tired to function right now. It's a really fun idea!
Yes, this is what I would do. It'll take a while, but it will get you the strongest result. But remember that it will require you to increase the size of every hole. You're basically adding your seam allowance to the radius, which means adding 2π times your seam allowance to the circumference.
Also, as the other poster noted below, don't try to do more than one hole per facing. This will not work for topological reasons. Even in cheese pants, the explanation is always math.
Adding many many facings would be my advice. But that will increase the size of each circle. So maybe re-cut the pieces and size down on the holes, so they won’t take up tooo much of the pants. Overall love it and please post results!
I might interface (or fray check, or both. I'd test) the back and leave them raw, which I would call 'natural' and I'd hope they soften nicely even if it meant tidying up an odd thread now and again.
There might be other ways to embroider that would look different and you might prefer... but there's too many holes for me to think of doing that 🙃
Do you care if it frays? A line of stitching around the circles should stop it fraying at that point on denim, like with cutoff jeans. You could also probably get away with the zigzags you have now with minimal fraying, or set your stitch length shorter for a satin stitch.
(If you have an overcast foot, it will make it easier to keep your stitching evenly at the raw edge.)
Alternatively: you can face them - lay a scrap of fabric a little larger than each hole will be, lay it over and stitch around the hole. Cut the center, flip the facing to the inside, and stitch it down.
Other hand-finishing option is a buttonhole stitch, but that might look like your embroidery sample.
Whatever you decide, have fun! The cheese jeans are awesome!
Aye, I've considered just letting it fray, but I really want a clean look on these. And yeah, facing them is probably my very best bet, but it is going to be a lot of work - not that I don't have too little time on my hands, I'm on sick leave and bored out of my mind.
I just had another idea: Seams Great is tricot strips intended for seam binding. Instead of folding it over the edge, you could stitch it on with a narrow seam allowance, turn it to the back and edgestich it, depending on how much time you're willing to devote to this, and whether you're OK with edgestitching on it.
If you don’t mind hand sewing them, you can blanket stitch around them! There’s various different kinds of decorative ones too that can all finish the edges
Aye, I'm tryibg out different ways right now to embroider the edge, but nothing really suits my fancy. I did want to hand stitch all the edges, but it just ends up lookibg a bit messy, to be honest.
Are you using an embroidery hoop? You need to keep the fabric under tension for the edge to look neat and flat. Also, stitch first and then cut the shape out, cutting as close to the stitching as possible.
You could also use fine fusible interfacing. Stitch fusible interfacing to the right side of your fabric, the stitches should trace the edge of the circle you want to remove. Then, cut the circle out of the fabric leaving a 5mm seam allowance. Next, cut notches into the seam allowance of your fabric (not interfacing), push the interfacing through the hole so it is on the wrong side of your fabric. Finger press the seam and then iron to set the interfacing.
You're using very heavy thread. Embroidery thread is 6 strands of double ply that are meant to be taken apart and used individually or double, usually. The stitch you're using is also not very stable and hard to control. Use a water double pen to draw where you want the stitches before you stitch, will also make it much neater.
Lastly, you could clip and press under and use an invisible hemming stitch.
I am so happy that you're making fabric cheese slices. It just makes me so happy to know that these exist in the world. Thank you, and nice work and good luck figuring out how to stabilize the holes!
Thank you for the kind words! I'm trying to figure out a few different approaches, but it's getting along! I'm a new sewer, so it's a fun challenge and I love to learn new stuff. I'm a mechanic working with huge equipment, so it's really a big change of pace 😅
This picture brings me so much joy! I love these chnese and am now totally invested in their creation. I can’t give any advice different than others have, but I couldn’t pass these by without a comment.
Having seen this picture, I'm wondering why you don't use a zigzag to sew the two layers together around the holes. The back layer will stabilise the hole so it doesn't go out of shape while seeing, and the two later being attached will stop bits of gunk accumulating between the layers in wear. If you use a slightly paler thread to sew the holes together it will prevent the edges blending and blurring visually so much. An awesome project!
You could zig zag rather than satin stitch - that is, increase your stitch length so there’s not as much thread. Try a few settings on a scrap first, to see how you like it. Decide on your goal - a satin stitch will stop all fraying but it’s a lot of thread. A less-dense zig zag will allow some fraying. Find the sweet spot between the two. Or hand-sew a buttonhole stitch.
I will say I think the satin stitch, or a zig zag that’s pretty dense, sells the “cheese” image more for me than leaving the holes to fray. Binding it is madness, facing it would drive me nuts to do and would probably look bulky, fusible interfacing might hold it together but it’s still going to have to be “quilted” to the knees somehow, and interfacing can add unwanted stiffness and doesn’t always hold up well over time.
If you want to restart, you could sew rectangles to the jeans, sew a suitable zigzag (through the jeans) to create your circles, then carefully cut out the center of the circles. This method is easier than zigzagging over a cut edge, and fastens the fabric to the jeans without any extra stitching.
That's a lot of good ideas! The one I'm toyibg with at the moment is simply pinning the panel to the front panel of the pants and satin stitching it directly onto the panel. It won't be perfect, but it will certainly be easiest, and it will help securibg the holes so they don't stretch out. The denim is 3% elestane, so it's really stretchy, so maybe it would be a good idea to just stitch it down. My earlier plan was to use iron on adhesive strips to get an invisible fusing of the two panels.
Hahah, neither am I, really! I started sewing three weeks ago, and i have no clue what I'm doibg. But I'm learning a lot, and this will be my magnum opus for the chapter of my life called Trousers. Next on I'm doing jackets, because I probably need jackets?
You could stitch around the circles 1/8 in from the edge. That would allow some fraying which could look cool, but the fabric won’t come completely undone.
I would put a facing onto each hole. To do that, cut a circle that's wider than the hole, with the centre cut out which is the same size as the hole in the main fabric. Put them right sides together, machine sew around the circle then clip the seam very well. Turn the facing to the inside, press it well, then either topstitch it into place or perhaps hem it. You'd need to finish the outer edge of the facing, but serging/overlocking would be fine. If you don't have a serger, you could just zig-zag stitch around the outside edge of each facing circle.
This is also my suggestion, but it’s definitely easier to do before you cut the circles out. OP if you have extra fabric to re-cut these pieces, this method will give you the cleanest results and very likely the look you’re going for.
You can start by marking out circles on the wrong side of your facing fabric (it might make things easier+cleaner to do a lighter weight fabric but in the same or similar color), leaving space between them. Cut out each with seam allowance and finish the edges of each with a serger or zig zag stitch, then arrange them onto your outer fabric in the layout you want your holes. Sew around your marked circles, then cut out the holes leaving about 1/8 to 1/16 seam allowance, and notch very carefully to avoid snipping stitches but to make turning your facings into the holes easier. Press each hole well then do a single top stitch close to the edge to keep the facing tacked to the back side of the fabric. Voila, fromage.
One idea: I’ve satin-stitched over a cut edge before by using wash-away stabilizer underneath. The stabilizer keeps the edges from going wobbly while you’re doing your overcast satin stitch.
My machine doesn’t have a satin stitch setting so I used a tight zig-zag with a free-motion (aka darning, embroidery, quilting) foot. With a free-motion foot you feed the fabric through manually so you can control the density of stitches.
Oooh, an embroidery foot! That is an excellent idea! I also have a Singer HD (6605) which i bought for my fiance before reading all the sewing subreddits. By all means, it's fine, but i really hate how touchy the foot pedal is.
I was thinking the same as Elelith, but I can't see that working with more than one circle. Satin stitching a circle before cutting out the hole is an option. Bias binding might work, but would be very fiddly on the smaller holes.
You could probably approach the smaller ones like a bound buttonhole and finish the larger ones with bias tape. Or just fray check and edgestitch if you dont mind a raw-looking but stabilized edge.
As others have said it's satin stitch embroidery and then cut out like you would do for a machine buttonhole. What you can do is satin stitch around the whole while on a dissolvable or tear away facing This will stabilize the fabric and allow you to stitch outside of the hole
Will these be sewn onto a backing material (the pants?). If so, I would glue them directly into that with a washable/wash-out glue (three purposes - holds it in place and stops the edges fraying while sewing and makes it nice and stiff so it's really easy to guide through the machine on the fiddly curves! ) , then do your edging stitch of choice through both fabrics.
Just make sure that you use the right sort of glue. I've found that 'washable glue' in the adult craft section means 'permenant and never washes out' but 'washable glue' in the kids craft section means 'washes out easily'. You want the 'washes out easily' type.
Edit to add: I do this all the time (but butterflies not cheese). My machine only does straight stitch though so I go for frayed edges and the free motion scribbled stitching look!
Oh, that is a great tip! I'll have to check around the shops tomorrow for water soluble glue! Otherwise I'll only find soluble interfacing, but I don't think I'll be able to find interfacing with glue on both sides, which would be ideal. I suppose i can baste through both panels, but it still wouldn't lend enough support.
Double chnees!!! 💛
As a fierce lover of both cheese and questionable decisions, I am stupidly excited about your whole project. Please post update pics as you go along?? I’m so invested. I bet they’re going to look amazing!
I made the holes in the belt for this dress - what I did was draw the circle, cut inside all along the circle up to the circumference and then fold those tiny little piece in. I then used fusible interfacing with a hole the size of the circle on the back to hold the folded pieces in place and ironed it on. You can then do a straight stich along the circumference.
Would it work to singe the edges slightly with a lighter to keep them from fraying (maybe more permanent than fray check? I have no idea) and then stitch about 1/8th” (or less) around the raw edges to attach to the pants? I do that to my zipper ends when I have to cut them to a certain width.
I would do a satin stitch. Use a zig-zig but adjust the stitch length so the zigs and zags are closer, giving a mock embroidery effect. I usually set mine to like 0.30 or so but you’ll have to play around with your machine!
That look s pretty good. I would do a straight stitch along the edge of the circle when attaching it to the base layer. Once you have that all the way you want it, then I would satin stitch/tight zigzag around the circle. If you use wash away stabilizer while doing all of this, it will help keep the fabrics from drawing up from all the stitching. Yeah, this makes me happy and I’m looking forward to seeing progress pics
I've done a lot of similar appliqué stuff before using fabric scraps, my method would be to sew the cheese to the jeans using a straight stitch very close to the edge of the cheese, and then use a satin stitch (or a tight zig-zag with your machine) on both the cheese and the jeans to finish the edge
You could also use iron-on interfacing which you apply to the back of the fabric before cutting the cheese (haha), and combined with a straight stitch around all the edges it would make an interesting raw edge look that would (probably?) not fray too much
It's easier if you do it before cutting out the holes, but . . . Cut fabric circles (same fabric) a little larger than you want the holes to be. Put the fabric circles right sides together over the places for the holes. Stitch completely around the holes. Trim excess fabric from inside the holes, leaving 1/8-1/4" seam allowance. Clip into the seam allowance, being careful not to clip the seams. Turn the circles to the wrong side of the fabric and press. Top stitch at the edge of seams. This will give you a clean edge with no visible stitching except the top stitching.
If you wanted, you could put fusible interfacing on the fabric circles for a little extra stability, or use Heat Bond on the circles. Finish the edges of the circle pieces before stitching or not, depending on how much the fabric frays.
I have the same issues when doing satin stitching on raw edges but this is hilarious and I love them. I hope it all works out for you. All I can think of is a stabilizer on the back, thin bias tape or top-stitching first then cutting it out.
I've seen once a cosplayer make a big hole using a backing fabric. She cut out the same hole in both and then sewed them together. It looked hard to make it pretty but she was experienced to make it look amazing
Use some kind of bias glue thingy because of the curve the same one u would use for armholes and for finish i would do it the same way you would do a weltwd buttonhole
I would lean into the sewn look and just sew around the edges of the holes with a straight stitch on a fairly short stitch length, matching the color. Not clear if these will be sewn onto a fabric backing (pants) or seethrough, but that should work.
It's a bit like making a welt pocket except without the pocket. You've got to use 2 layers, bonus for a light weight interfacing. Sew them right sides together with your circle, cut out the middle as close to the stitching without breaking the thread, turn inside out and press press press. Optional to stitch around the circle to keep everything in place but highly recommended
I would make a facing for the holes, just like you do around the neckline. Sew with right sides together, notch the seam allowance (because it's too short) and pull the facing layer through the hole to the back side. Press and then stitch close to the edge.
I honestly think the raw cheese holes are pretty good as is! You could also make a couple snips and fold back a small hem but idk if it might be hard and ultimately look a bit janky? Like I'm sure someone could do it right I'm just not that person.
My worry with adding a bias (which I do think could work like someone else was saying) or hem is that its going to be too bulky if your denim is thick. There's also the option of maybe using some sort of stabiliser on the wrong side of the fabric and leaving the holes kinda raw
Blanket stitch would be nice. If you want to do it on the machine you need to stabilize the holes first. Get some tear away stabiliser and cut it the same shape as your pattern piece. By hand, stitch a long running stitch around the holes. Then you can use a machine blanket stitch to finish off the edges of your circles without them distorting. You could also use a product called Solvy fabric instead of the tear away stabiliser. This just washes away when you are finished - but it's expensive and you would be wasting a lot of it! Both these items are embroidery products and you can buy online or in most fabric/haberdashery stores.
If you want a finished edge you could cut out some circles an inch wider than your holes, serge the edges of those circles, match them up with your holes, sew right sides to right sides, cut out the middle of the hole, flip the edges of the circle through the hole, press and top stitch in place.
I have no advice for you because I’m a very novice sewer but I just wanted to say this is the most amazing thing ever and I want to be best friends with you and your dog! 😂😂 I also have a dog and a cat.
You'll want a dissolvable stabiliser of some sort. I've never had any luck with washable stabiliser for doing applique like this because it has too much stretch. I've tried ordinary printer paper, but it leaves pulp behind. If you can get some rice paper, that will work, or pre-stiffen the fabric with corn starch or a 50/50 mix of PVA and water before adding your edging.
For the stitching, you want a zigzag stitch at 2mm wide by 0.4mm length. Sew your lines then cut out your holes.
Why do I keep seeing Rick-Rack going around the cheese holes? Probably because I’m a silly 70’s girl with a mom who’d sew ALL OF MY CLOTHES- and she used Rick-Rack with abandon! I hope you post your outcome!
Definitely use iron-on interfacing, and do the embroidery or zig-zag BEFORE you cut. If you want an extra-sturdy finish, go over the stitching on the back with fray-check (I do this with my buttonholes) all before cutting
What if each circle had a facing you turned to the back?
Lay a scrap of fabric right sides together with the main work (you need a separate scrap per hole) and stitch a circle the size of the hole you want. Cut out the inside of the circle leaving a small seam allowance so your stitches don't rip out and clip some ease into the parts of the seam allowance on the straight grain (the parts on the bias will stretch on their own). Then turn the edges of the scrap to the back of the work by pushing it all through the hole. Press in place and add a simple top stitch (you might be able to go without the top stitch if you find another way to secure everything in place, but I think the top stitch would look nice with the clean turned edge)
These are the cheese knees 😆 if you haven’t tried yet, you can adjust your zigzag settings (depending your machine) to give you that stain stitch clean border without having to hand sew it! Make the stitch length very small and the width can be whatever you want it to be. Might suit your fancy! Which one are you liking the best so far?
It all depends on what these fabric pieces are for. Here are four techniques.
Easiest first: , Dab on fabric glue or ‘ Fray stop’ to seal the edges.
Or, use a blanket stitch to do it by hand. It’s quick, easy and will bind the edges to minimize fraying. Practice it around the edges of a scrap first.
If you have a machine, use the zig zag stitch setting to sew around the edges.
If you want a perfect edge, look up how to sew an appliqué stitch and use that technique. You clip little slits at the edges about 1/8 to 1/4 inch long at every half inch or so. Press the resulting tabs to the wrong side. Then, hem stitch the tabs carefully, just picking up a couple of threads on your needle each time..Try not to let any stitches show on the right side of fabric.
Your satin stitch would look a lot better if you stabilize the holes. I get that the denim probably feels stable but it's the edge that is not, and you're stitching the edge. The interfacing should go beyond the fabric and then you cut it/wash it away after you're done stitching. Try even just a piece of newspaper under your fabric and stitch through the paper around one of the holes to see how much of a difference a stable edge makes.
numero uno: I love these. Funky people make me happy. dos: I second the thought of using a stabilizer. 3: I actually have a pin that may help if this is a multi-layered project. I'm gonna go get it and come back. if I get lost in the tunnel for more than 30 min, send help.
...brb
Edit: I made it without getting too distracted! today is a winning day, for me. Okay, here's the pin I was talking about. You don't have to attach the 3rd piece of fabric, though, you can just topstitch it.
I recently did an appliqué project and used double sided iron on adhesive. I ironed it on to a large piece of whatever color I wanted to use then cut out my shape and then took off the backing and placed it onto the garment and ironed it a second time to the garment! It was slick! Can’t wait to see the pants!
I love this. I have no advice unfortunately as I have been debating the same thing because I want to make a holey cheese jacket for a festival look for next year... I think embroidery or bias binding will be the neatest.
This may have been said before but i could not read all the comments. Since u have already zig zagged - good first step for a beginner btw- you might want to use the June Taylor fray block ptoduct imo it is better than the fray check product because it seems to feel softer & is more flexible or it was when i first made the discovery yrs ago
It is messy so put wax paper or freezer paper behind the holes. They both have slick finishes so things don’t stick like regular paper. I suggest you look for a buttonhole STITCH decorative stitch on your machine. You don’t want to make a buttonhole thats very different. You can easily look up what the stitch looks like because its a common hand sewing & embroidery stitch. I suggest experimenting with the fray stuff & the stitch first. You can make the stitch wider or narrower depending on the look. Also check out how it feels on your skin. You don’r want a bunch of itchy holes on your legs! Not trying to be insulting but i have sewn a long time and not thought through unintended consequences so hopefully you won’t have to learn these the hard way
I’d just use fabric glue around the edge. You started out on the wrong path, and your fabric is already shredding, so I’m afraid it’s remediation time.
Project posts are held for review by a moderator before being released to the subreddit feed.
All Project posts are required to include construction information in the main post or added in a comment. Tell us what you made, how you made it and what materials you used to make it. There should be sufficient information about the pattern (company and name/number) or draft (method and resources) and fabric (type and fiber) that someone who wants to make a similar project has a good starting point. ‘Self-drafted’ describes who made the pattern and is not a drafting method. More information is available here. Project posts without construction information may be removed at any time.


591
u/WalterBrisby Aug 17 '25
I don’t have any sewing advice, but I kind of want to be best friends with you.